Optocouplers
Optocouplers were discovered right after photo-transistors (like any other transistor, except it is stimulated by light), by combining a LED and photo-transistor in the same case. The purpose of an optocoupler is to separate two parts of a circuit.
This is done for a number of reasons:
- Interference. Typical examples are industrial units with lots of interferences which affect signals in the wires. If these interferences affected the function of control section, errors would occur and the unit would stop working.
- Simultaneous separation and intensification of a signal. Typical examples are relays which require higher current than microcontroller pin can provide. Usually, optocoupler is used for separating microcontroller supply and relay supply.
- In case of a breakdown, optocoupled part of device stays safe in its casing, reducing the repair costs.
Optocouplers can be used as either input or
output devices. They can have additional functions such as intensification
of a signal or Schmitt
triggering (the output of a Schmitt trigger is either 0 or 1 - it changes
slow rising and falling waveforms into definite low or high values). Optocouplers
come as a single unit or in groups of two or more in
one casing.
Each optocoupler needs two supplies in order to function. They can be used
with one supply, but the voltage isolation feature, which is their primary
purpose, is lost.
7.4.1 Optocoupler on an input line
The way it works is simple: when a signal arrives, the LED within the optocoupler is turned on, and it illuminates the base of a photo-transistor within the same case. When the transistor is activated, the voltage between collector and emitter falls to 0.7V or less and the microcontroller sees this as a logic zero on its RA4 pin.
The example below is a simplified model of a counter, element commonly utilized in industry (it is used for counting products on a production line, determining motor speed, counting the number of revolutions of an axis, etc). We will have sensor set off the LED every time axis makes a full revolution. LED in turn will 'send' a signal by means of photo-transistor to a microcontroller input RA4 (TOCKI). As prescaler is set to 1:2 in this example, every second signal will increment TMR0. Current status of the counter is displayed on PORTB LEDs.
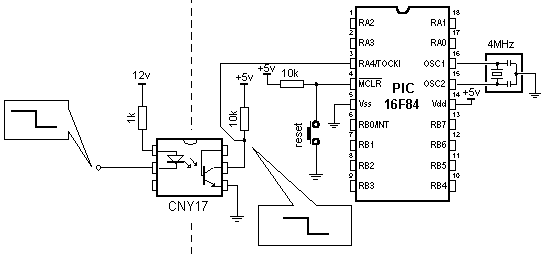
Example of optocoupler on an input line
        PROCESSOR  16f84
        #include "P16F84.inc"
__CONFIG _CP_0FF  &  _WDT_0FF  &  _PWRTE_0N  &  _XT_0SC


            ORG        0X00                 ;Reset vector
            GOTO      MAIN
            ORG        0X04                 ;Interrupt vector
            GOTO      MAIN                    ;no  interrupt routine

MAIN                                        ;Main program
            BANKSEL TRISA
            MOVLW   OXEF                     ;Initialization of port A
            MOVWF   TRISA                     ;TRISA <-  Oxff
            MOVLW   0X00                      ;Initialization of port B
            MOVWF   TRISB                     ;TRISB <-  0x00
            MOVLW   B'00110000'             ;RA4 ->  TMR0,   PS=l:2
            BANKSEL  OPTION_REG
            MOVWF    OPTI0N_REG             ;Increment TMR0 upon falling edge
            BANKSEL  P0RTB
            CLRF      P0RTB                 ;P0RTB <-  0
            CLRF      TMRO                     ;TMR0 <-  0

LOOP
            MOVF      TMR0,W                 ;Send value  of  the  counter
            MOVWF    P0RTB                     ;to  P0RTB
            GOTO      LOOP                    ;Remain at this  line
            END                                ;END of  program
Optocoupler on an
output line
An Optocoupler can be also used to separate the output signals. If optocoupler LED is connected to microcontroller pin, logical zero on pin will activate optocoupler LED, thus activating the transistor. This will consequently switch on LED in the part of device working on 12V. Layout of this connection is shown below.
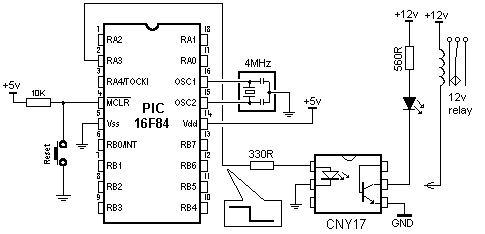
Example of optocoupler on output line
The program for this example is simple. By delivering a logical one to the third pin of port A, the transistor will be activated in the optocoupler, switching on the LED in the part of device working on 12V.
User Comments
No Posts found !Login to Post a Comment.